
|
|
Comments: This is the second of three uses of Obverse 3 and the second and final use of Reverse B. Reverse B has not been found in any other years. |
Obverse 3 The following photo shows the Obverse 3 attribution grid. The date position is virtually identical to obverse 1. The only slight difference is the date grid. The right base of the 1 is RE on Obverse 1, JL of RE on Obverse 3 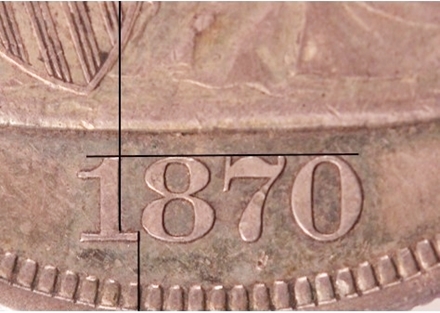 1870-CC Obverse 3 attribution grid Obverse 3 is similar to Obverse 1, but exhibits few markers that allow easy identification (die state a, seen only on the OC-4 die marriage, is an exception, with major die markers. These are shown in the description of OC-4). The most obvious features are the LACK of any of the markers described for Obverse 1. In addition there is a light die line in the shield that can be noted on mid- to high-grade examples. This feature is shown on the next photo. 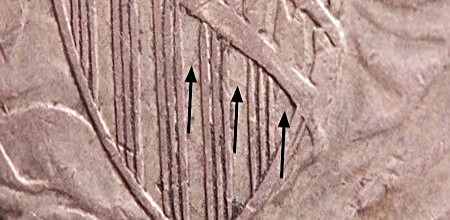 1870-CC Obverse 3 die line in shield recesses The line is very light, but still visible in the picture. It arcs across shield recesses 5, 6, and 7, extending to the border of the shield. It should be visible under medium to high magnification, 10-power or more, for coins grading XF40 or higher. It will be difficult to see on lower grades.
OC-5 has been found only with obverse die state b. |
The following photo shows the attribution lines for 1870-CC Reverse B. 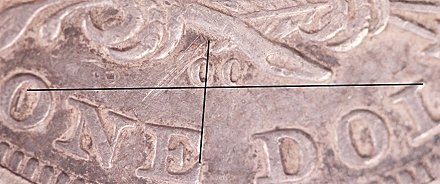 1870-CC Reverse B attribution lines Reverse B is one of two close CC reverses. The other is Reverse D. These two reverses are difficult to differentiate. The mintmark positions are slightly different, but not enough so to be notable to the eye. The distinguishing feature is the presence (or lack of) a die line extending to the left from the lower tip of the upper arrow feather. This die line is seen on Reverse D, but not on Reverse B. The two reverses are compared in the composite photo below. The arrow in the top picture points to the die line on Reverse D. The square in the bottom photo shows the same area, and lack of the die line, on Reverse B. The presence of this die line, or lack of its presence, can be determined on examples grading as low as VG. Reverse B was used to strike OC-3 and OC-5. Reverse D was used to strike OC-6 and OC-7. 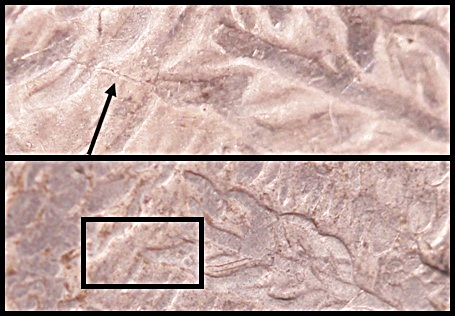 1870-CC Reverse B (lower) and Reverse D (upper)
|
| Photo credits:
Obverse 3: 1870-CC PCGS AU53, from the Osburn-Cushing reference collection. Reverse B: 1870-CC PCGS XF40 CAC, from the Osburn-Cushing reference collection. Reverse D: 1870-CC PCGS AU50, from the Osburn-Cushing reference collection. |