
Our attribution methodology is focused on measurements that can be estimated using a 10-power (or less) glass. We purposely avoided measurements that require a measuring reticle or a microscope. The goal was to develop a methodology that could be used on the bourse floor. We hope that we’ve come close to achieving that goal.
Obverse Die Attribution
We attribute obverse dies by measuring or estimating five elements of the date position, then adding notable die markers. The date position is determined as follows (reference the date attribution grid photo that follows):
 |
Our first and second measures (estimates if working on the bourse floor) are the vertical positions of the 1st and 4th digits relative to the denticles and the rock. These are eyeball estimates rather than exact measurements. Possible choices are VERY HIGH (VH), HIGH (H), SLIGHTLY HIGH (SH), VERY SLIGHTLY HIGH (VSH), CENTERED (C), VERY SLIGHTLY LOW (VSL), SLIGHTLY LOW (SL), LOW (L), and VERY LOW (VL). For the coin shown the position of the 1 is VSL. The central shaft of the 1 is very slightly closer to the denticles than to the rock. The position of the 9 is L. The 9 is much closer to the denticles than to the rock. |
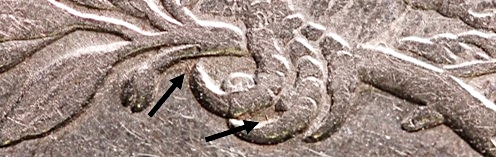
and Lump in Gown
Our third measurement (or estimate when viewing coins on the bourse floor) is the position of the right edge of the base of the 1 relative to the denticles. Possible choices are BETWEEN (B), RIGHT EDGE (RE), JUST LEFT OF RIGHT EDGE (JL of RE), RIGHT QUARTER (RQTR), JUST RIGHT OF CENTERED (JR of C), CENTERED (C), JUST LEFT OF CENTERED (JL of C), LEFT QUARTER (LQTR), JUST RIGHT OF LEFT EDGE (JR of LE), and LEFT EDGE (LE). For the coin pictured the position is RIGHT EDGE, or RE.
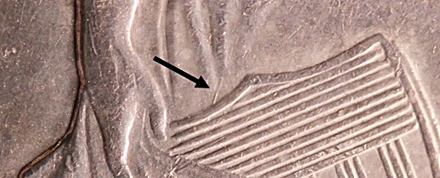
Our fourth measurement (or estimate when viewing coins on the bourse floor) is the point at which a line extended from the right edge of the upright of the 1 intersects the vertical shield lines. The photo shows a measurement of 5-2.0, meaning that the line crosses the edge of the shield at vertical line 2 of the 5th group of 3. If the line crosses between two vertical lines we note it as x.5, for example 4-2.5. We also include “virtual lines”. The space between the 4th and 5th groups of lines is considered to be vertical lines 4-4.0 and 4-5.0.
Our fifth measurement is the slope of the date relative to the rock above. The choices are UP, SLIGHTLY UP, LEVEL, SLIGHTLY DOWN, AND DOWN. For the coin pictured in the photo the slope is LEVEL. The distance from the top of the 1 to the rock base is the same as the distance from the top of the 9 to the rock base.
Other major features are used, when present, to identify obverse dies. These include misplaced dates, doubled dies, and repunched dates. The following photos show examples of these features.
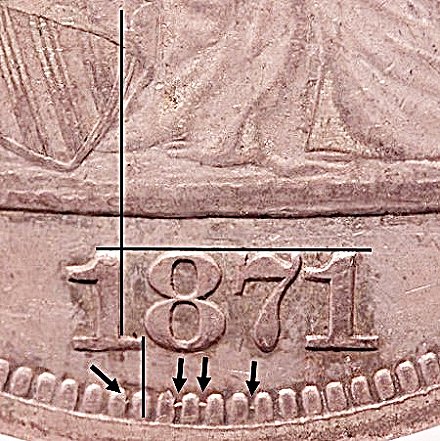
1871 Obverse 11 misplaced date
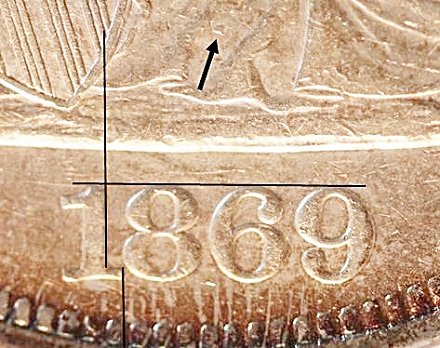
1869 Obverse 6 die doubling
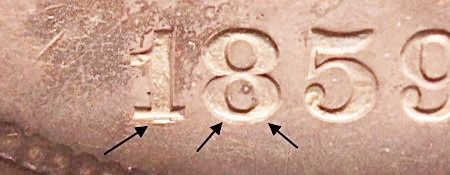
1859-S Obverse 1 repunched 18
Once the date position is completely described and other features such as those described above are assessed we can usually conclusively identify the die. In a few cases, however, several obverse dies have similar date positions and no other discerning features. Additional information is required to uniquely identify the die. For these cases die markers must be identified. Die markers are tiny lines, lumps, or other features that are unique to a particular die. Lines and lumps are usually recesses in the surface of the die, and appear as raised lines or lumps on the minted coins. Unfinished areas are areas in the fields where die polishing hasn’t been sufficient to achieve a perfectly level surface. Unfinished areas are usually adjacent to major design elements. Where these features are required to distinguish a particular die we’ve attempted to identify markers that can be seen with a 10-power (or less) glass. This isn’t always possible. In a few cases a stereo microscope is required to make a positive attribution. We hope that the publication of the information contained here-in will minimize these cases.
The following photos show examples of die lines, lumps, and unfinished areas, the types of markers usually used for die attribution. Note that these types of markers are used to attribute both obverse and reverse dies.
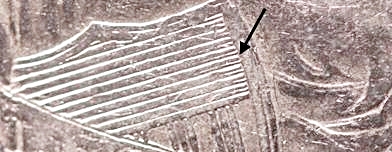
1871 Obverse 5 die line above shield

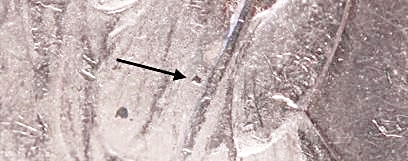
1873 Obverse 1 lump on neck
and unfinished area under chin
Reverse Die Attribution
Attributing reverse dies is dependent on whether they include a mintmark. For coins minted at Philadelphia we use only die markers for attribution. These are described in the previous section, and apply to the reverse as well as the obverse.
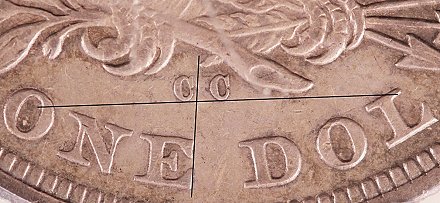
Coins minted at the branch mints feature a mintmark, which makes attribution a little easier. Mintmarks were hand-punched into the dies, and thus the position of the mintmark on each individual die varies. For mintmarked dies we include attribution lines as noted in the following photo. The first line extends from the intersection on the branch and arrow feather to the left side of the denticle below the left side of the D. This line is exactly in line with the left side of the D. The second line is perpendicular to the first, half-way between the top of the D and the intersection. We have few enough mintmarks in the series that a visual picture of this position is usually sufficient to uniquely identify the mintmark location.
1860-O Reverse C mintmark position
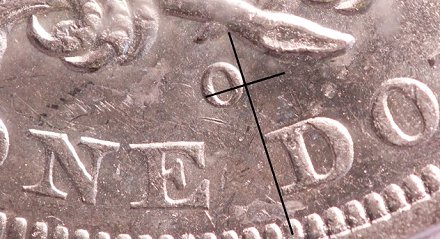
We align the mintmark in a different way for coins from the Carson City mint. The photo below shows the alignment grid. This grid was originally created by Steve Petty in an article in the Gobrecht Journal (reference 9). We’ve found that it’s a very effective way to differentiate the CC reverse dies.
The vertical line extends from the feather tip to the upper right edge of the E in ONE. The horizontal line underlines the mintmark and extends far enough in both directions to intersect the letters in ONE DOL. The position of the first C relative to the vertical line and the points of intersection of the horizontal line with the letters of ONE DOL give us sufficient attribution information to differentiate the six known Carson City reverse dies. This process is only required for 1870-CC, since the other CC years use only a single reverse die.
1870-CC Reverse C mintmark position
Other major features are used, when present, to identify reverse dies. These include doubled dies and repunched mintmarks. To date we’ve found NO repunched mintmarks in the series, but we have found numerous doubled reverse dies. Most of the doubled dies are with motto dies, but at least one has been discovered in the no motto era. The following photos show examples of these features.
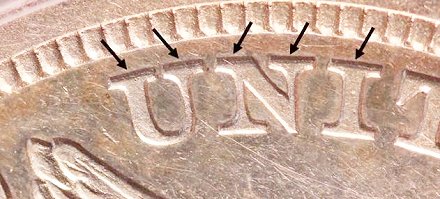
1865 Reverse PA die doubling -
Most visible as widening of the top of the letters in UNITED
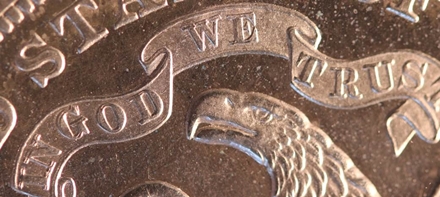
1872 Reverse PA die doubling -
Most visible as sharp doubling of the tops of the letters in "IN GOD WE"
Most Seated Dollar reverse dies are from the Philadelphia mint, so the mintmark position can’t be used for attribution, and most don’t display die doubling. For these dies we fall back on the same descriminators that we use for obverse dies – die lines, die pits (lumps on the coin surface), and unfinished areas. The following photos provide examples.
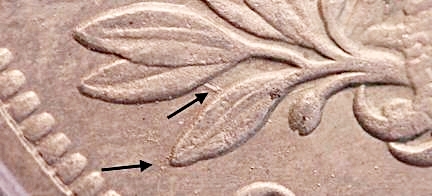
1870 Reverse PA die line joining leaves
1870 Obverse 6 lump near pole
1871 Reverse E unfinished area between leaves
Other features can be used when available, but those described above represent about 98% of the features we use for attribution.
To attribute a particular coin first go to the Quick Attribution Chart. Look for the obverse or reverse die that’s used most often for the year. If your coin uses this die then determine the second die used and complete the attribution. If not, go to the date and determine its position. Match this against those noted for the year. Once the obverse die is determined check the reverse to make sure it matches a listed die marriage. Once both dies are identified the attribution is complete.
Always remember that the pictures won’t always match your coin exactly. Die wear and polishing can cause the markers to appear slightly different on two coins struck by the same die pair. Try to verify your attribution by finding additional markers that match. If you can’t make a match, or if you find a pairing of known dies that’s not listed in this reference please let us know. We’d like to keep our website as current as possible, and include new findings in future updates of our book.
Happy hunting!!!
| Photo credits:
1869 Obverse 7 Attribution Grid and Lump: 1869 NGC AU53, from the Osburn-Cushing reference collection. 1871 Obverse 11 Misplaced Date: 1871 NGC AU53, from the Osburn-Cushing reference collection. 1869 Obverse 6 Die Doubling: 1869 PCGS XF40, from the Osburn-Cushing reference collection. 1859-S Obverse 1 Repunched 18: 1859-S NGC AU53, from the Osburn-Cushing reference collection. 1870 Obverse 5 Die Line: 1870 PCGS XF40, from the Osburn-Cushing reference collection. 1873 Obverse 1 Lump and Unfinished Area: 1873 PCGS AU cleaned, from the Osburn-Cushing reference collection. 1860-O Reverse C Mintmark: 1860-O PCGS MS61, from the Osburn-Cushing reference collection. 1870-CC Reverse C Mintmark: 1870-CC PCGS AU53, from the Osburn-Cushing reference collection. 1865 Reverse PA Die Doubling: 1865 PCGS PR55 CAC, from the Osburn-Cushing reference collection. 1872 Reverse PA Die Doubling: 1873 PCGS PR61, from the Osburn-Cushing reference collection. 1870 Reverse A Die Line: 1870 PCGS PR61 (mis-attributed as a proof by PCGS), from the Osburn-Cushing reference collection. 1873 Reverse B Lumps: 1873 ANACS AU58, from the Osburn-Cushing reference collection. 1871 Reverse E Unfinished Area: 1871 AU cleaned, from the Osburn-Cushing reference collection. |