
|
|
Comments: This is the third of four uses of Obverse 2 and the second and final use of Reverse D. Reverse D has not been found in any other years. |
Obverse 2 The following photo shows the attribution grid for obverse 2. This die is easy to identify since it’s the only obverse with the base of the 1 lining up left of centered.  1870-CC Obverse 2 attribution grid
|
The following photo shows the attribution lines for 1870-CC Reverse D.  1870-CC Reverse D attribution lines Reverse D is the second of two close CC reverses. Mintmark positions are slightly different, but not enough to be notable to the eye. The distinguishing feature is the presence (or lack of) a die line extending from the lower tip of the upper arrow feather. The two reverses are compared in the composite photo below. The arrow in the top picture points to the die line on Reverse D. The square in the bottom photo shows the same area, and lack of the die line, on Reverse B. The presence of this die line, or lack of its presence, can be determined on examples grading as low as VG. Reverse B was used to strike OC-3 and OC-5. Reverse D was used to strike OC-6 and OC-7. 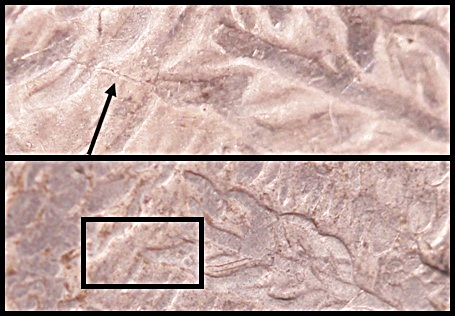 1870-CC Reverse B (lower) and Reverse D (upper)
|
| Photo credits:
Obverse 2: 1870-CC PCGS AU55, from the Osburn-Cushing reference collection. Reverse B: 1870-CC PCGS XF40 CAC, from the Osburn-Cushing reference collection. Reverse D: 1870-CC PCGS AU50, from the Osburn-Cushing reference collection. |